
Cart is empty.
Item Quantity Price Total: $0

Getting Started
Before running LCDC it is quite important to make sure your LCD/VFD screen is connected and working correctly to you computer. You should follow you installation guide etc. that comes with the screen, and use the test software to make sure that everything works as expected. Once you are happy that your LCD/VFD screen is connected and working correctly make mental (or physical note) of any settings, such as com port and speed, then exit any application that might be using the LCD/VFD screen and install/run LCDC.
Configuring LCDC
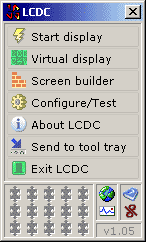
Star LCDC by clicking it's icon or running it from the Start menu, you will now have the main menu on the screen :
First of all you have to configure it so select the "Configure/Test" option that will take you to the configuration screen :
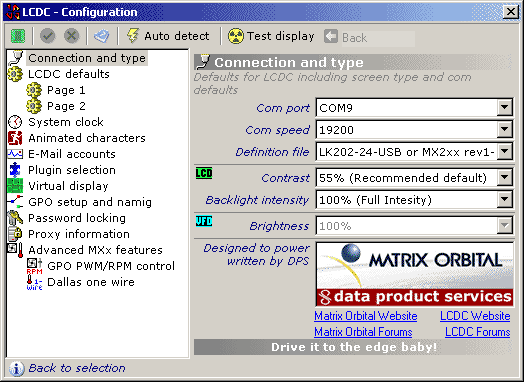
Automatic detection, just click the "Auto detect" and once completed select the screen you want to use. For manual setup, use the mental/physical notes you made early on, set the Com port and Com speed up correctly. In order for LCDC to actually write information to your screen, it needs to be told what kind of screen it is, this is done in the Definition file settings. If you click the small down arrow at the end of this selection you should see a list of different screen types, so select your screen (Note: we do not support every LCD screen out there!). You should of noticed that the Tick and cross at the top of the configuration screen has changed from grayed out (unselectable) to colour as shown below.

This means the LCDC is waiting for you to confirm your changes made, and will limit what else you can do until you have confirmed these changes. Please note that you can not change items on this page and then select another page and change items, you must save or cancel changes before changing pages! There are also a couple of other options on this page, you can if you want change the contrast or brightness of your screen (if when the text scrolls it looks like it is vanishing then try increasing the contrast a few percent). If you want to make sure your setting are correct, you can click on the "Test display" option which will allow you to send text direct to the screen. That should all work, and once done hit "Back" to return you to the main configuration screen.
Okay now LCDC knows what kind of screen you have you can see that on the left side there are a few other items, these are all covered in the "Configuration" help so I won't go into them in detail. However I will jump into the Plugins page as it is quite important to configure this, so select the "Plugin configuration" on the left side of the screen, the screen should now look like this:
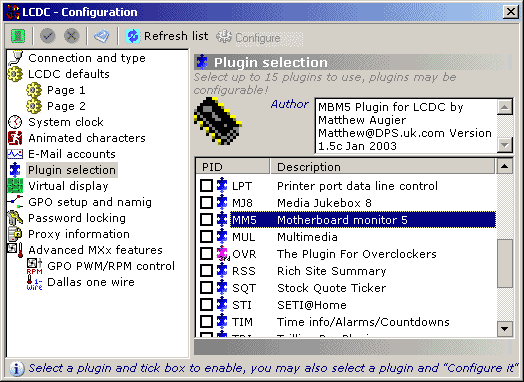
As you can see this is a list of plugins, and any with a tick in the box next to them are enabled, as this is probably the first time you have run through LCDC they will all be blank and you need to decide which ones you would like on. Each plugin has it's own help file and some of them are configurable as well, this is shown in the top bar when you click on it as the Configure button will be enabled or disabled. For this getting started guide I will use the MM5 (An interface to Motherboard Monitor 5) and RSS (A plugin that gathers rich site summary from websites) plugins, so select them and click the tick to save!
Now the RSS plugin needs to be configured, you can't have it checking every internet site in the world! so we need to tell it which sites we want. Select the line that says RSS Rich Site Summary and hit the Configure button at the top of the screen.
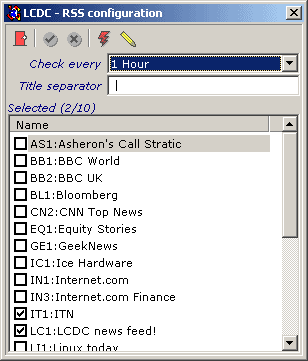
Remember that this is a "Plugin" and not directly related to LCDC (almost a separate program) so it can not be configured within LCDC. For this example we will leave the Check every and Title separator at there defaults, all we need to do now is select the feed LC1:LCDC news feed! by clicking in the box to the left of it to leave a tick mark. Now click the green tick to save this modification and exit the RSS configuration screen. There is no configuration on the MM5 plugin so you don't have to do anything on that one.
We can now close this screen (although you are more than welcome to explore it further and customise LCDC further) and return us to the main menu. If you click Start/Stop display you will get an error message saying No screens to display (or enabled!) this is because you haven't yet told LCDC what to display, so you now need to enter into the Screen builder where we create a profile of what we want LCDC to display and how we want to display it! (The "information bar" has been turned on in these shots, just click the (i) to do this)
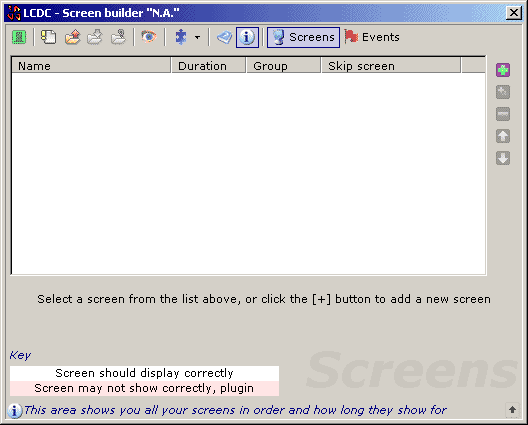
As you can see the screen builder is blank! that's why LCDC couldn't display anything! To create our first screen click on the [+] on the righthand side of the screen and you should now see :
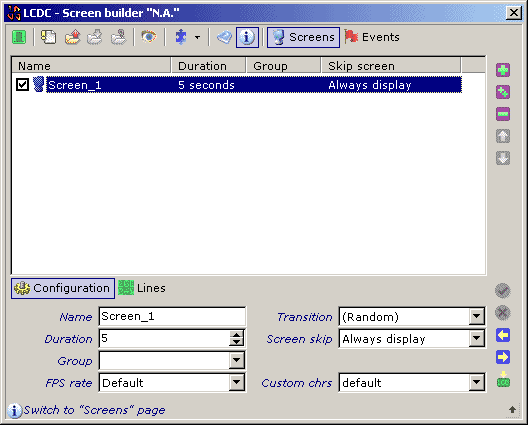
The screen is split into two areas, selectable by the "Configuration" and "Lines" options. The Configuration area controls features of that screen, and the Lines area controls each line and how it should be displayed. In the Configuration section, change the Duration to 10 (seconds, 0=indefinite), and the Name to Static text. For this first screen it will be just some simple text, so switch the Lines area, and ensure that 1 is selected (the top line of the display) and then in the box next to Text enter This is my first test screen using the example in LCDC!. Now select the second line, by clicking on the 2 and you should notice that the text you just entered vanishes! Don't worry it's still there :) if you click 1 again it was on the top line, so hot 2 again to return. For line 2 enter I like LCDC!. Just like the configuration screen, you should of noticed that when you started to edit any of the information for the screen/line the Tick and Cross to the right of this box now light up :

So once you have finished making you changes (or if you change something by accident) you can select to save or revert those changes. Note: nothing is saved to disk until you select to save it using one of the disk icons at the top of the screen, all this does is commit it to memory. Right lets test this, there are two ways, either we can quit this screen and hit start, or preview it on the LCD! So hit the eyeball (looking left) icon at the top of the screen, and your display will now show these two lines....hmmm... not very interesting is it! Lets spruce it up a bit. Okay select Line 1 again,change the Scroll to Always and make sure the Style says <<Left. Now select Line 2 and change the Alignment to Centre (Spelt the English way!). You should notice that we have not turned of the live preview (don't need to) however it still looks the same?!! Well the reason is that you have not "Committed" these new changes to memory, so hit the Tick (like above) to commit these changes - Now were cooking! The top line should now be scrolling our text while the second line should have "I Like LCDC!" nicely in the middle of the screen.
Okay so that was quite simple, lets create another screen (Hit the [+]) and Name it RSS Feed and set the Duration 30. Now select Line 1 and set the Scrolling to Always (and Style to <<Left). Now on line 1 enter LCDC news: then at the end of that line hit the diamond to enter the Text definition.
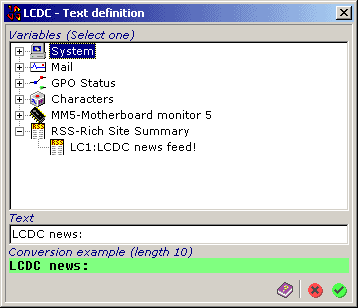
Okay, now we want to add a variable, that LCDC will replace with the correct text for us, as you can see there is a tree view of all the variables that LCDC knows of, if you look at the bottom of this list, you will see our RSS-Rich Site Summary that we enabled in the configuration, and if you expand it (click the + next to it) we should see the feed we selected in the plugins configuration LC1:LCDC news feed! (as shown above). Now if you double click that line the Text should change to LCDC news:[#$RSSLC1] but hopefully you should see in the Conversion example what it will actually look like (If you don't have a net connection at the time the feeds tried to update, it will say Feed not yet checked) :

Okay to accept this change to the Text click the tick :) and now this will be entered into Text 1 of the screen designer. Now select Line 2 and go straight into the text definition (click the diamond at the end of the line!), select the variable System/CPU/Speed (expand each one) and now your Text should say [#$SysCPUSpe] click at the end of this and enter "mhz" (not the extra space after it) then select the variable System/CPU/Processor name then hit the tick! Set the Effect for this line to Bounce (scrolls it left then right) and hit the tick to commit this screen to memory. Now he display should be showing you the latest LCDC news, and a bit of CPU information.
Now exit this screen and use the Start/Stop display and lets see the whole thing in action.